CLUTCH FLUID REPLACEMENT/AIR BLEEDING [C66M-R]
id0510ma166800
-
Caution
-
• Do not allow clutch fluid to get on a painted surface. Clutch fluid contains properties which can dissolve the paint. If clutch fluid gets on a painted surface, wash it off with water immediately and wipe the area off completely.
• Do not mix different types of clutch fluid, otherwise the clutch may not operate normally.
• Do not reuse old clutch fluid, otherwise the clutch may not operate normally.
-
Note
-
• A common reserve tank is used for the clutch system and brake system.
1. Remove the front under cover No.2. (See FRONT UNDER COVER No.2 REMOVAL/INSTALLATION.)
2. Remove the reserve tank cap.
3. Connect a vinyl tube to the bleeder screw.
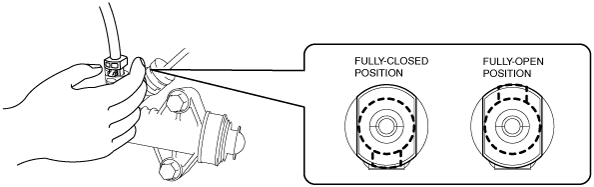
4. Turn the bleeder screw to the fully-open position by hand and drain any clutch fluid from the bleeder screw.
5. Turn the bleeder screw to the fully-closed position and close.
6. Add new clutch fluid to the MAX mark of the reserve tank.
-
Clutch fluid
-
European (L.H.D. U.K.) specs.: SAE J1703 or FMVSS116 DOT-3 or DOT-4
General (L.H.D. R.H.D.) specs.: SAE J1703 or FMVSS116 DOT-3
7. Bleed the air from the clutch system.
-
Caution
-
• Keep the clutch fluid level in the reserve tank at 3/4 full or more during air bleeding.
- (1) Connect a vinyl tube to the bleeder screw.
-
- (2) Place the other end of the vinyl tube in a clear container, and fill clutch fluid in the container during air bleeding.
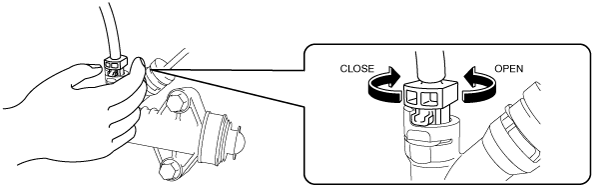
- (3) Working with two people, one loosens the bleeder screw.
- (4) While one technician depresses the clutch pedal and another technician opens the bleeder screw by hand, drain any clutch fluid containing air bubbles.
-
-
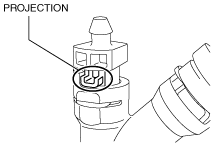
• When closing the bleeder screw, securely close the bleeder screw until the projection is turned to the position shown in the figure.
- (5) After waiting approx. 5 s or more, tighten the bleeder screw.
- (6) Return the clutch pedal slowly taking 3 s or more while suppressing the spring force.
- (7) Wait approx. 5 s or more.
- (8) Continue to perform air bleeding (Steps (3) - (7)) until no air comes from the vinyl tube.
- (9) Fill the reserve tank to MAX mark with the clutch fluid.
-
-
Clutch fluid
-
European (L.H.D. U.K.) specs.: SAE J1703 or FMVSS116 DOT-3 or DOT-4
General (L.H.D. R.H.D.) specs.: SAE J1703 or FMVSS116 DOT-3
8. Install the reserve tank cap.
9. Install the front under cover No.2. (See FRONT UNDER COVER No.2 REMOVAL/INSTALLATION.)