|
am6zzw00008997
AUTOMATIC TRANSAXLE FLUID (ATF) ADJUSTMENT [GW6A-EL, GW6AX-EL]
id0517i2119300
1. Remove the front under cover No.2. (See FRONT UNDER COVER No.2 REMOVAL/INSTALLATION.)
2. Disconnect the wiring harness from the front crossmember. (Vehicle with i-ELOOP)
am6zzw00008997
|
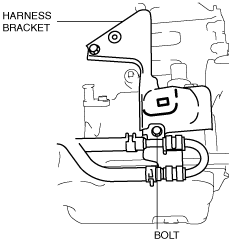
3. Disconnect the oil pipe No.1 from the harness bracket with the oil hose connected. (With Oil cooler No.2)
ac5wzw00003744
|
4. Remove the dipstick securing bolt.
5. Adjust the ATF level.
ac5wzw00003608
|
am3uuw00008393
|
|
ATF type |
|---|
|
ATF FZ
|
6. Insert the dipstick and install the securing bolt.
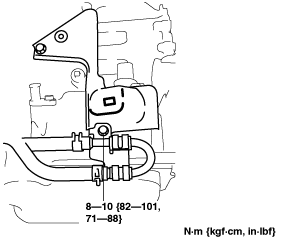
7. Install the oil pipe No.1 to the harness bracket. (With Oil cooler No.2)
ac5wzw00003747
|
8. Connect the wiring harness to the front crossmember. (Vehicle with i-ELOOP)
am6zzw00008997
|
9. Install the front under cover No.2. (See FRONT UNDER COVER No.2 REMOVAL/INSTALLATION.)