 |
am6zzw00013716
FUEL GAUGE SENDER UNIT REMOVAL/INSTALLATION [4WD]
id092200012002
Fuel gauge sender unit (main)
1. Perform the "Fuel Line Safety Procedure" referring to the "BEFORE SERVICE PRECAUTION". (See BEFORE SERVICE PRECAUTION [SKYACTIV-D 2.2].)
2. Refer to the [FUEL DRAINING PROCEDURE] and drain the fuel. (See FUEL DRAINING PROCEDURE [SKYACTIV-D 2.2].)
3. Disconnect the negative battery cable. (See NEGATIVE BATTERY CABLE DISCONNECTION/CONNECTION [SKYACTIV-D 2.2].)
4. Remove the rear seat cushion. (See REAR SEAT CUSHION REMOVAL/INSTALLATION.)
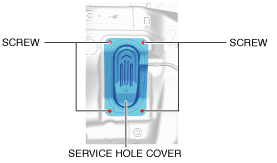
5. Remove the screws.
am6zzw00013716
|
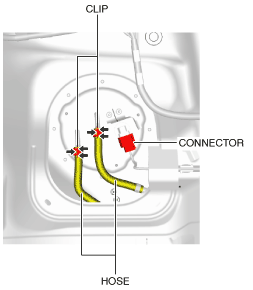
6. While pressing the tabs of clip in the direction of arrows (1) shown in the figure, pull clip in the direction of arrow (2) to detach the tabs of clip from the service hole cover.
7. Remove the service hole cover.
8. Disconnect the connector.
am6zzw00013717
|
9. Disconnect the hose from the set plate while pressing the tabs of the clips in the direction of the arrows shown in the figure.
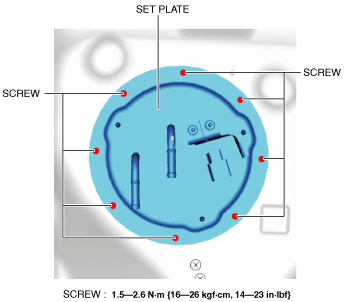
10. Remove the screws.
am6zzw00013718
|
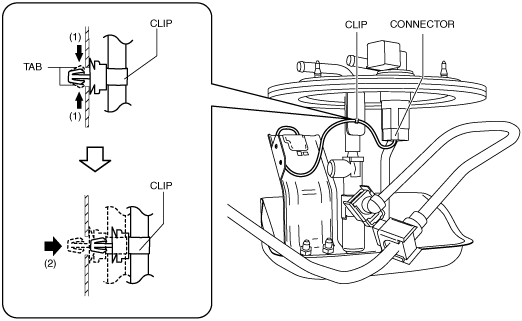
11. Lift the set plate up and disconnect the connector.
am6zzw00013719
|
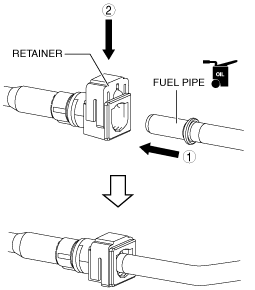
12. While pressing the tabs of the clip in the direction of arrows (1) shown in the figure, press the clip in the direction of arrow (2) to detach it from the set plate.
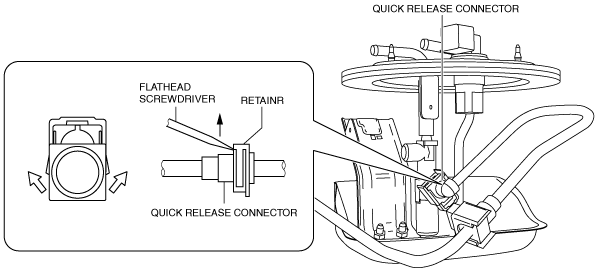
13. Move the retainer upward using a small flathead screwdriver or a similar tool.
am6zzw00013720
|
14. Pull out the fuel hose straight from the fuel pipe and disconnect it. (SeeQuick Release Connector Assembly Note.)
15. Cover the disconnected quick release connector and fuel pipe with vinyl sheeting or a similar material to prevent it from getting scratched or dirty.
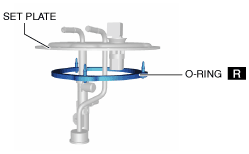
16. Remove the set plate.
17. Remove the O-ring.
am6zzw00013721
|
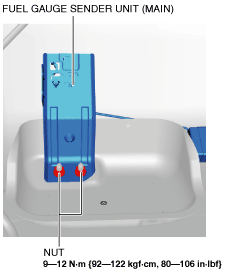
18. Remove the nuts.
am6zzw00014533
|
19. Remove the fuel gauge sender unit (main).
20. Install in the reverse order of removal.
21. Perform the fuel leakage inspection referring to “AFTER SERVICE PRECAUTION”. (See AFTER SERVICE PRECAUTION [SKYACTIV-D 2.2].)
Quick Release Connector Assembly Note
1. Inspect the fuel hose and fuel pipe sealing surface for damage and deformation.
2. Install the quick release connector.
am6zzw00013722
|
3. Lightly pull and push the quick release connector a few times by hand, and then verify that it is connected securely.
4. Perform the fuel leakage inspection referring to “AFTER SERVICE PRECAUTION”. (See AFTER SERVICE PRECAUTION [SKYACTIV-D 2.2].)
Fuel gauge sender unit (sub)
1. Perform the "Fuel Line Safety Procedure" referring to the "BEFORE SERVICE PRECAUTION". (See BEFORE SERVICE PRECAUTION [SKYACTIV-D 2.2].)
2. If the fuel gauge level indicates 1/2 or more, refer to the "FUEL DRAINING PROCEDURE" and drain the fuel. (See FUEL DRAINING PROCEDURE [SKYACTIV-D 2.2].)
3. Disconnect the negative battery cable. (See NEGATIVE BATTERY CABLE DISCONNECTION/CONNECTION [SKYACTIV-D 2.2].)
4. Remove the rear seat cushion. (See REAR SEAT CUSHION REMOVAL/INSTALLATION.)
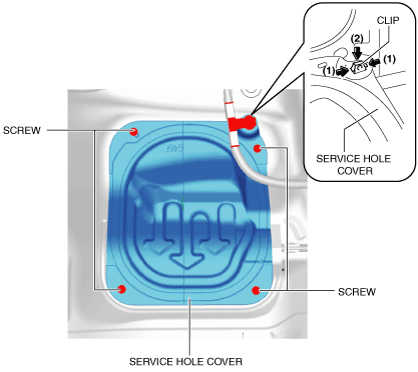
5. Remove the screws.
am6zzw00013723
|
6. Remove the service hole cover.
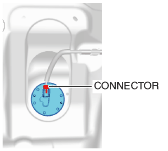
7. Disconnect the connector.
am6zzw00013724
|
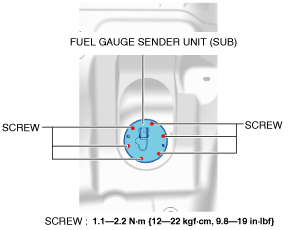
8. Remove the screws.
am6zzw00013725
|
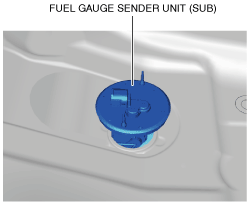
9. Remove the fuel gauge sender unit (sub).
am6zzw00013726
|
10. Install in the reverse order of removal.
11. Perform the fuel leakage inspection referring to “AFTER SERVICE PRECAUTION”. (See AFTER SERVICE PRECAUTION [SKYACTIV-D 2.2].)