HEADLIGHT AUTO LEVELING SYSTEM INITIALIZATION
id091800812200
-
Note
-
• The auto leveling control module/AFS control module/adaptive LED headlights control module records the vehicle height while it is unoccupied by performing the headlight auto leveling system initialization.
• Perform the headlight auto leveling system initialization if any of the following work is performed.
-
― Auto leveling control module/AFS control module/adaptive LED headlights control module replacement
― Auto leveling sensor replacement, removal/installation
― Work that can affect vehicle height such as suspension replacement or removal/installation.
• There are two types of procedures for headlight auto leveling system initialization, one which uses the M-MDS and the other which does not use it.
When Using M-MDS
-
Caution
-
• Perform Steps 5-6 within 30 s.
1. Empty the vehicle by having all occupants leave the vehicle and remove all the cargo except for the spare tire, jack and tools equipped on the vehicle.
2. Adjust the air pressure of each tire to the specified value. (See WHEEL AND TIRE SPECIFICATION.)
3. Move the vehicle to level ground.
4. Connect the M-MDS to the DLC-2.
5. Switch the ignition ON (engine off or on).
6. After vehicle identification, select in the following order from the M-MDS initial screen.
-
Note
-
• The LED headlight warning light continues flashing during the first initialization, however, continue the work because it does not indicate an improper procedure.
- (1) "Electrical"
- (2) "ExteriorLighting"
- (3) "Headlamp"
- (4) "Auto Leveling Sensor"
- (5) "Auto Leveling Sensors Calibration"
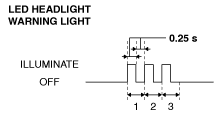
7. Verify that the LED headlight warning light flashes 3 times at 0.25 s intervals and turns off as shown in the figure.
8. Adjust the headlight aiming. (See HEADLIGHT AIMING.)
When Not Using M-MDS
-
Caution
-
• Perform Steps 4-5 within 30 s.
1. Empty the vehicle by having all occupants leave the vehicle and remove all the cargo except for the spare tire, jack and tools equipped on the vehicle.
2. Adjust the air pressure of each tire to the specified value. (See WHEEL AND TIRE SPECIFICATION.)
3. Move the vehicle to level ground.
4. Switch the ignition ON (engine off or on).
-
Note
-
• The LED headlight warning light continues flashing during the first initialization, however, continue the work because it does not indicate an improper procedure.
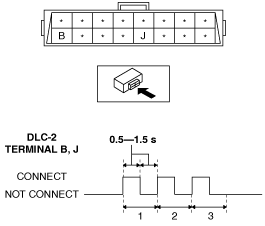
5. Using a jumper wire, connect DLC-2 terminals B and J (ground) 3 times at 0.5 to 1.5 s intervals as shown in the figure.
-
Caution
-
• If the terminals are mistakenly connected, vehicle damage or fire could occur. When connecting with the jumper wire, thoroughly verify what terminals are being connected to prevent a miss-connection.
6. Verify the LED headlight warning light.
-
• If the LED headlight warning light flashes
3 times at
0.25 s intervals and turns off as shown in the figure, the initialization is completed. Go to the next step.
• If the LED headlight warning light continues flashing, the procedure may be performed incorrectly. Repeat the procedure from Step 4.
-
― Repair or replace the malfunctioning part, then repeat the procedure from Step 4.
7. Adjust the headlight aiming. (See HEADLIGHT AIMING.)