 |
am6zzw00010791
REAR MOUNT CAMERA REMOVAL/INSTALLATION
id092000814900
4SD
1. Disconnect the negative battery cable. (See NEGATIVE BATTERY CABLE DISCONNECTION/CONNECTION [SKYACTIV-D 2.2].) (See NEGATIVE BATTERY CABLE DISCONNECTION/CONNECTION [SKYACTIV-G 2.0, SKYACTIV-G 2.5].) (See NEGATIVE BATTERY CABLE DISCONNECTION/CONNECTION [SKYACTIV-G 2.0, SKYACTIV-G 2.5 (WITHOUT i-stop)].)
2. Remove the trunk lid recess. (See TRUNK LID RECESS REMOVAL/INSTALLATION.)
3. Remove the trunk lid trim. (See TRUNK LID TRIM REMOVAL/INSTALLATION.)
4. Remove the trunk lid garnish. (See TRUNK LID GARNISH REMOVAL/INSTALLATION.)
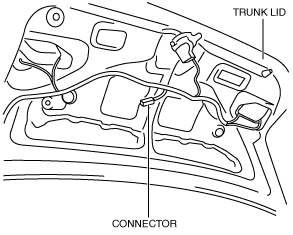
5. Disconnect the connector.
am6zzw00010791
|
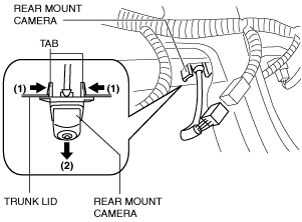
6. Press the rear mount camera tabs in the direction of arrows (1) shown in the figure, press the rear mount camera in the direction of arrow (2) shown in the figure, and disengage the rear mount camera tabs from the trunk lid.
am6zzw00010792
|
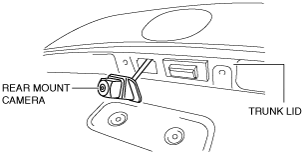
7. Remove the rear mount camera.
am6zzw00010793
|
8. Install in the reverse order of removal.
9. If the rear rear mount camera is replaced, perform the parking assist system initialization (calibration). (Type displaying predicted vehicle track) (See PARKING ASSIST SYSTEM INITIALIZATION (CALIBRATION).)
WGN
1. Disconnect the negative battery cable. (See NEGATIVE BATTERY CABLE DISCONNECTION/CONNECTION [SKYACTIV-D 2.2].) (See NEGATIVE BATTERY CABLE DISCONNECTION/CONNECTION [SKYACTIV-G 2.0, SKYACTIV-G 2.5].) (See NEGATIVE BATTERY CABLE DISCONNECTION/CONNECTION [SKYACTIV-G 2.0, SKYACTIV-G 2.5 (WITHOUT i-stop)].)
2. Remove the following parts:
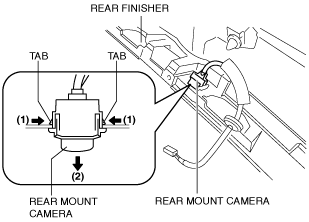
3. Press the rear mount camera tabs in the direction of the arrows (1) shown in the figure, pull the rear mount camera in the direction of the arrow (2) shown in the figure, and disengage the rear mount camera tabs from the liftgate garnish.
am6zzw00010794
|
4. Remove the rear mount camera.
5. Install in the reverse order of removal.
6. If the rear rear mount camera is replaced, perform the parking assist system initialization (calibration). (Type displaying predicted vehicle track) (See PARKING ASSIST SYSTEM INITIALIZATION (CALIBRATION).)