MAZDA ERA-GLONASS CONTROL MODULE REMOVAL/INSTALLATION


id092200666000

1.  When replacing the Mazda ERA-GLONASS control module, perform the forrowing procedure.

(1)  Connect the M-MDS to the DLC-2.
(2)  After the vehicle is identified, select the following items from the initialization screen of the M-MDS.
1.  Select "Electrical" .
(3)  Then, select items from the screen menu in the following order.
1.  Select "DCM" .
2.  Select "Configuration mode" .
3.  Select "Install new module" .
(4)  Perform the procedure according to the directions on the screen.

2.  Disconnect the negative battery cable. (See NEGATIVE BATTERY CABLE DISCONNECTION/CONNECTION [SKYACTIV-D 2.2].) (See NEGATIVE BATTERY CABLE DISCONNECTION/CONNECTION [SKYACTIV-G 2.0, SKYACTIV-G 2.5].) (See NEGATIVE BATTERY CABLE DISCONNECTION/CONNECTION [SKYACTIV-G 2.0, SKYACTIV-G 2.5 (WITHOUT i-stop)].)

3.  Remove the following parts:

(1)  Upper panel (See UPPER PANEL REMOVAL/INSTALLATION.)
(2)  Rear console (See REAR CONSOLE REMOVAL/INSTALLATION.)
(3)  Console side panel (See CONSOLE SIDE PANEL REMOVAL/INSTALLATION.)
(4)  Shift lever knob (MTX) (See MANUAL TRANSAXLE SHIFT MECHANISM REMOVAL/INSTALLATION [D66M-R, D66MX-R].) (See MANUAL TRANSAXLE SHIFT MECHANISM REMOVAL/INSTALLATION [C66M-R].)
(5)  Selector lever knob (ATX) (See AUTOMATIC TRANSAXLE SHIFT MECHANISM REMOVAL/INSTALLATION.)
(6)  Shift panel (See SHIFT PANEL REMOVAL/INSTALLATION.)
(7)  Front console box (See FRONT CONSOLE BOX REMOVAL/INSTALLATION.)
(8)  CD player (with CD player) (See CD PLAYER REMOVAL.)(See CD PLAYER INSTALLATION.)
(9)  DVD/CD player (with DVD/CD player) (See DVD/CD PLAYER REMOVAL.)(See DVD/CD PLAYER INSTALLATION.)
(10)  Side wall (See SIDE WALL REMOVAL/INSTALLATION.)
(11)  Front console (See FRONT CONSOLE REMOVAL/INSTALLATION.)
(12)  Rear vent duct (See REAR VENT DUCT REMOVAL/INSTALLATION.)

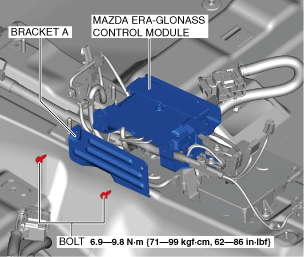
4.  Remove the bolts.

am6zzw00015434

5.  Remove bracket A.

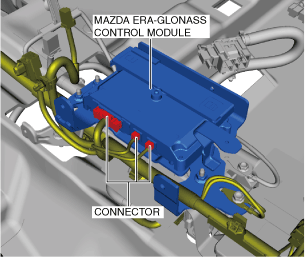
6.  Disconnect the connectors.

am6zzw00015438

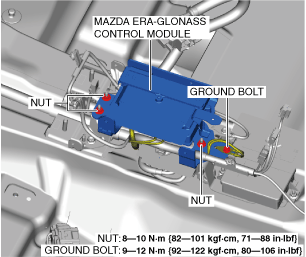
7.  Remove the ground bolt.

am6zzw00015435

8.  Remove the ground.

9.  Remove the nuts.

10.  Remove the Mazda ERA-GLONASS control module and bracket B as a single unit.

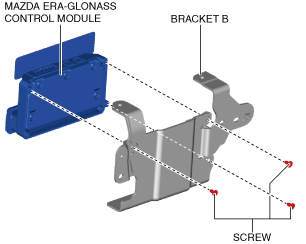
11.  Remove the screws.

am6zzw00015436

12.  Remove the Mazda ERA-GLONASS control module from bracket B.

13.  Install in the reverse order of removal.

14.  When replacing the Mazda ERA-GLONASS control module, perform the procedure according to the directions on the M-MDS screen.

15.  When the Mazda ERA-GLONASS control module is replaced, perform the Mazda ERA-GLONASS control module finalization procedure.(See MAZDA ERA-GLONASS CONTROL MODULE FINALIZATION PROCEDURE.)