MAP LIGHT REMOVAL/INSTALLATION


id091800801200


Front Map Light

1.  Disconnect the negative battery cable. (See NEGATIVE BATTERY CABLE DISCONNECTION/CONNECTION [SKYACTIV-G 2.0, SKYACTIV-G 2.5 (WITHOUT i-stop)].) (See NEGATIVE BATTERY CABLE DISCONNECTION/CONNECTION [SKYACTIV-G 2.0, SKYACTIV-G 2.5].) (See NEGATIVE BATTERY CABLE DISCONNECTION/CONNECTION [SKYACTIV-D 2.2].)

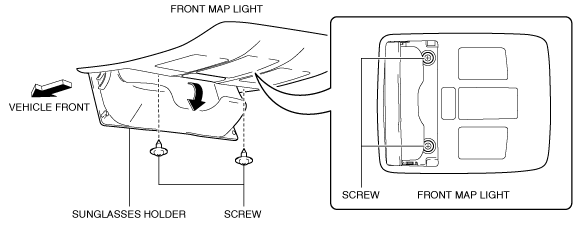
2.  Open the sunglasses holder.

3.  Remove the screws.

am6zzw00008038

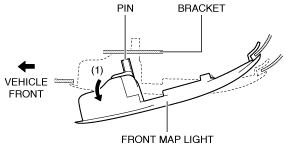
4.  Move the front map light in the direction of the arrow (1) shown in the figure to pull out the pin from the bracket.

Caution
•  Be careful not to pull the connector out strongly when removing the front map light. Otherwise, the contact surface of the wiring harness secured to the headliner will come off and the wiring harness could be pulled out. If the front map light is installed with the wiring harness pulled out, the wiring harness could get caught between the headliner and front map light bracket resulting in an open or short circuit in the wiring harness.
am6zzw00008039

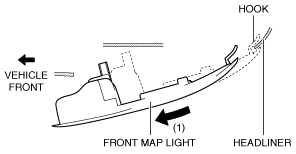
5.  Move the front map light in the direction of the arrow (1) shown in the figure to pull out the front map light hook from the headliner.

am6zzw00012767

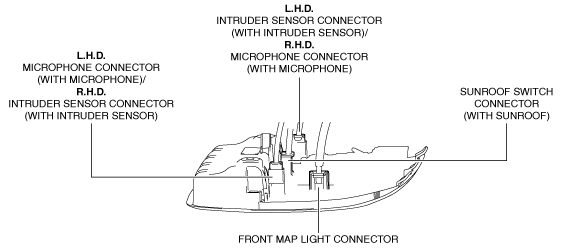
6.  Disconnect the connector.

am6zzw00008144

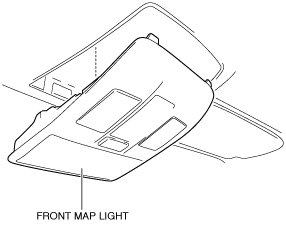
7.  Remove the front map light.

am6zzw00008041

8.  Install in the reverse order of removal.


Rear Map Light

1.  Disconnect the negative battery cable. (See NEGATIVE BATTERY CABLE DISCONNECTION/CONNECTION [SKYACTIV-G 2.0, SKYACTIV-G 2.5 (WITHOUT i-stop)].) (See NEGATIVE BATTERY CABLE DISCONNECTION/CONNECTION [SKYACTIV-G 2.0, SKYACTIV-G 2.5].) (See NEGATIVE BATTERY CABLE DISCONNECTION/CONNECTION [SKYACTIV-D 2.2].)

2.  Remove the following parts:

4SD
1.  Sunroof seaming welt (with sunroof system) (See SUNROOF UNIT REMOVAL/INSTALLATION.)
2.  A-pillar trim (See A-PILLAR TRIM REMOVAL/INSTALLATION.)
3.  Sunvisor (See SUNVISOR REMOVAL/INSTALLATION.)
4.  Front map light (See Front Map Light.)
5.  Assist handle (See ASSIST HANDLE REMOVAL/INSTALLATION.)
6.  Front scuff plate (See FRONT SCUFF PLATE REMOVAL/INSTALLATION.)
7.  Front side trim (RH) (with center display) (See FRONT SIDE TRIM REMOVAL/INSTALLATION.)
8.  Rear scuff plate (See REAR SCUFF PLATE REMOVAL/INSTALLATION.)
9.  B-pillar lower trim (See B-PILLAR LOWER TRIM REMOVAL/INSTALLATION.)
10.  Adjust anchor cover (See FRONT SEAT BELT REMOVAL/INSTALLATION.)
11.  Upper anchor installation bolt on the seat belt (See FRONT SEAT BELT REMOVAL/INSTALLATION.)
12.  B-pillar upper trim (See B-PILLAR UPPER TRIM REMOVAL/INSTALLATION.)
13.  Rear seat cushion (See REAR SEAT CUSHION REMOVAL/INSTALLATION.)
14.  Rear seat side back (See REAR SEAT SIDE BACK REMOVAL/INSTALLATION.)
15.  Tire house trim (See TIRE HOUSE TRIM REMOVAL/INSTALLATION.)
16.  C-pillar trim (See C-PILLAR TRIM REMOVAL/INSTALLATION.)
17.  Upper panel (See UPPER PANEL REMOVAL/INSTALLATION.)
18.  Rear console (See REAR CONSOLE REMOVAL/INSTALLATION.)
19.  Console side panel (See CONSOLE SIDE PANEL REMOVAL/INSTALLATION.)
21.  Selector lever knob (ATX) (See AUTOMATIC TRANSAXLE SHIFT MECHANISM REMOVAL/INSTALLATION.)
22.  Shift panel (See SHIFT PANEL REMOVAL/INSTALLATION.)
23.  Front console box (See FRONT CONSOLE BOX REMOVAL/INSTALLATION.)
24.  CD player (with CD player) (See CD PLAYER REMOVAL.) (See CD PLAYER INSTALLATION.)
25.  DVD/CD player (with DVD/CD player) (See DVD/CD PLAYER REMOVAL.) (See DVD/CD PLAYER INSTALLATION.)
26.  Side wall (See SIDE WALL REMOVAL/INSTALLATION.)
27.  Front console (See FRONT CONSOLE REMOVAL/INSTALLATION.)
28.  Rear vent duct (See REAR VENT DUCT REMOVAL/INSTALLATION.)
29.  Headliner (See HEADLINER REMOVAL/INSTALLATION.)
WGN
1.  Sunroof seaming welt (with sunroof system) (See SUNROOF UNIT REMOVAL/INSTALLATION.)
2.  A-pillar trim (See A-PILLAR TRIM REMOVAL/INSTALLATION.)
3.  Sunvisor (See SUNVISOR REMOVAL/INSTALLATION.)
4.  Front map light (See Front Map Light.)
5.  Assist handle (See ASSIST HANDLE REMOVAL/INSTALLATION.)
6.  Front scuff plate (See FRONT SCUFF PLATE REMOVAL/INSTALLATION.)
7.  Front side trim (RH) (with center display) (See FRONT SIDE TRIM REMOVAL/INSTALLATION.)
8.  Rear scuff plate (See REAR SCUFF PLATE REMOVAL/INSTALLATION.)
9.  B-pillar lower trim (See B-PILLAR LOWER TRIM REMOVAL/INSTALLATION.)
10.  Adjust anchor cover (See FRONT SEAT BELT REMOVAL/INSTALLATION.)
11.  Upper anchor installation bolt on the seat belt (See FRONT SEAT BELT REMOVAL/INSTALLATION.)
12.  B-pillar upper trim (See B-PILLAR UPPER TRIM REMOVAL/INSTALLATION.)
13.  Rear seat cushion (See REAR SEAT CUSHION REMOVAL/INSTALLATION.)
14.  Rear seat belt lower anchor installation bolt (See REAR SEAT BELT REMOVAL/INSTALLATION.)
15.  Trunk board (See TRUNK BOARD REMOVAL/INSTALLATION.)
16.  Trunk side pocket (See TRUNK SIDE POCKET REMOVAL/INSTALLATION.)
17.  Trunk end trim (See TRUNK END TRIM REMOVAL/INSTALLATION.)
18.  Trunk side upper trim (See TRUNK SIDE UPPER TRIM REMOVAL/INSTALLATION.)
19.  C-pillar trim (See C-PILLAR TRIM REMOVAL/INSTALLATION.)
20.  D-pillar trim (See D-PILLAR TRIM REMOVAL/INSTALLATION.)
21.  Headliner (See HEADLINER REMOVAL/INSTALLATION.)

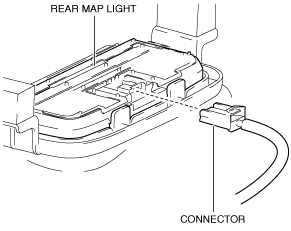
3.  Disconnect the connector.

am6zzw00008042

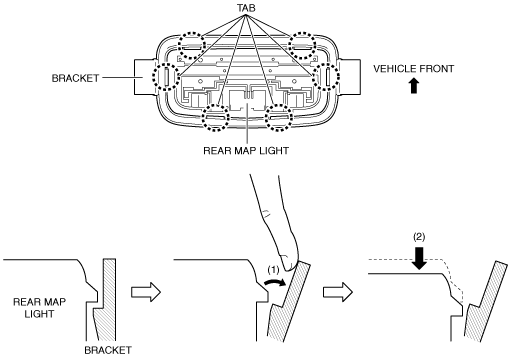
4.  Move the bracket in the direction of the arrow (1) shown in the figure, and press the rear map light in the direction of the arrow (2) shown in the figure to detach the rear map light tab from the bracket.

am6zzw00008043

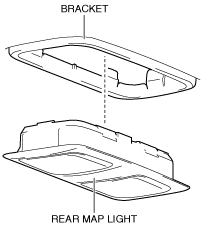
5.  Detach all the rear map light tabs and bracket and remove the rear map light from the bracket.

am6zzw00008044

Caution
•  If the rear map light is removed from the bracket, the rear map light may fall off and be damaged. When removing the rear map light from the bracket, hold the rear map light on the lens side with a hand during servicing.

6.  Install in the reverse order of removal.